Installing Software
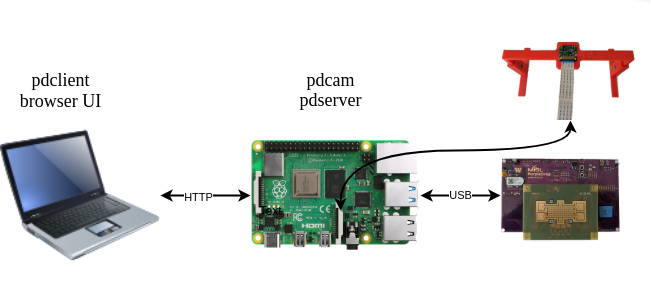
The PurpleDrop driver software is written in python should work on any OS, but has been primarily tested on Linux and MacOS. It’s possible to plug a PurpleDrop directly into a laptop USB port and run the python driver there, however there are some advantages to using a raspberry PI single-board computer to host your device:
The purpledrop softare supports using the raspberry pi camera for a live view of the electrode board.
Installing the software on a Raspberry PI allows for a consistent environment and avoids potential difficulties that can arise installing python packages on various platforms.
You can control the PurpleDrop via network connection, which means that you can setup an experiment and let it run without your laptop present, and even check in on it remotely.
These instructions are written for installing software onto a Raspberry PI running RaspiOS. It is generally applicable on other platforms as well, but the details may differ.
Base OS install
First, install the Raspberry PI OS with Desktop image onto a micro SD card. You can use other operating systems, such as Ubuntu, but these instructions are based on the Raspberry PI OS and some details may vary for others.
I recommend Balena Etcher for writing images to your micro SD.
Network Setup
It is possible to plug a monitor, mouse and keyboard into the raspberry pi and use it locally. However, if you want to be able to control the PI from another computer – usually very convenient – you will need to set up networking so that you can connect to the PI from your computer. To do this, you will need to get the PI connected to either your ethernet network or wifi, and find it’s IP address.
It is possible to configure networking while headless by placing configuration onto the uSD card, as described in the raspberry pi documentation linked above, but temporarily connecting a monitor and keyboard may make it easier.
In order to enable connection to the raspberry PI from anywhere, regardless of your networking configuration, you may wish to install a VPN service such as tailscale or zerotier.
Unfortunately, there are a number of options and exactly what you need will depend on your network setup and use-case, so these instructions won’t go into detail. Instead, please see the raspberry PI documentation, and the many tutorials that can be found online for setting up a raspberry PI. At the end of the day, you should be able to login to the pi via SSH.
Software setup
Change Password
The raspberry pi image comes with a default password of “raspberry” for the user “pi”. You should change this, using the passwd command.
Update apt packages
sudo apt update
sudo apt upgrade
Install tmux
This is optional, but highly recommended. Tmux allows your ssh sessions to outlive your connection, so that you can log in, run something, and have it continnue running after you disconnect from your ssh session. You can then pick up on the same terminal the next time you log in. It also allows you to more easily run multiple processes at once, by allowing multiple windows on the same ssh connection.
To install tmux: sudo apt install tmux
To start a tmux session: tmux.
To create a new windows in your session, type CTRL-b, c (that’s control + b
together, followed by the c key). You should see the list of active windows on
the status bar at the bottom of your terminal. To switch back to the first
window (number 0), you can type CTRL-b, 0.
To reconnect later, you can run tmux attach, or tmux a. To see what
sessions are running: tmux ls. Tmux does a lot more; checkout
https://github.com/tmux/tmux/wiki for more info.
Install purpledrop python package
First, install dependencies:
sudo apt install libatlas-base-dev
Download the latest driver from the purpledrop-driver github project, and use pip to install:
mkdir ~/install
cd ~/install
git clone https://github.com/uwmisl/purpledrop-driver
cd purpledrop-driver
pip3 install .
To test your installation, you should be able to run pdcli info. If you have a purpledrop connected to the USB port on the raspberry pi, this command should print out the serial number and software version found on it.
Note
If your device isn’t detected, you may need to program or update the embedded firmware on the PurpleDrop. See Bootloading the PurpleDrop using DFU.
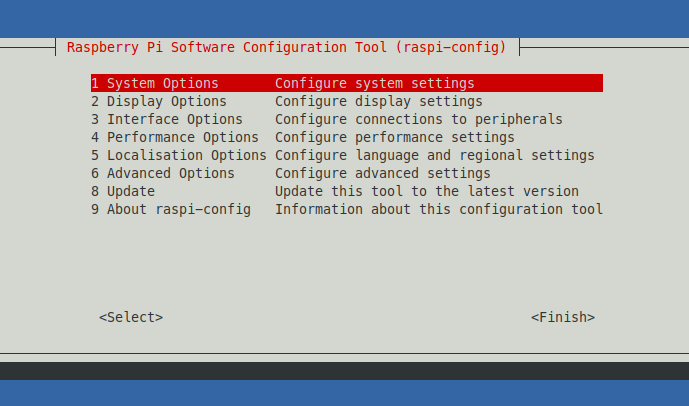
Enable the camera
If you want to use the raspberry pi camera with pdcam for live view or recording of the purpledrop, you must enable the camera. You can do this with the sudo raspi-config command. Navigate to “Interface Options”, and enable the camera. You will have to reboot for this to take effect (sudo reboot).
Programming PurpleDrop embedded software
It’s possible to update your PurpleDrop software image via USB bootloader from the raspberry pi.
To install the dfu-util program: sudo apt install dfu-util.
Find the latest purpledrop release from the purpledrop-stm32 releases page, copy the URL for the .dfu file, and download it to the raspberry pi, e.g.: wget https://github.com/uwmisl/purpledrop-stm32/releases/download/v0.3.1/purpledrop-v0.3.1.dfu.
Boot the PurpleDrop into bootloader mode by holding the BOOT button while pressing and releasing the RESET button.
Program the file using dfu-util: dfu-util -a 0 -D purpledrop-v0.3.1.dfu.
Launching the server
To launch the server for use, login to the PI via SSH, and start a tmux session.
To run the server: pdserver --board "misl_v4.1". This starts the daemon, and tells it to use the board definition file for the MISL electrode board v4.1.
If all goes well, the server should start and report that it detected a purpledrop device:
pi@purpledrop:~ $ pdserver --board "misl_v4.1"
Launching HW server...
20:44:37.784 WARNING (purpledrop): Connected to purpledrop 355434653039 on /dev/ttyACM0
If you are using the camera, you have to start the pdcam daemon as well. Open a new tmux window by typing CTRL-B, followed by C. Then, run pdcam with pdcam server --flip (the –flip option is optional, and depends on how your camera is mounted).
Now, you can switch back and forth between the tmux windows by typing CTRL-B followed by 0 or 1.
The server provides a web interface on port 7000, so you can point your browser to http://yourraspberrypiaddress:7000 to load the control dashboard. It should look something like this:
